Connect the Refrigerant Piping to the Outdoor Unit for Wall-Mounted SystemsUpdated a day ago
Introduction
This article explains how to connect the refrigerant piping to the outdoor unit for wall-mounted systems.
The length of the refrigerant piping will affect the performance and energy efficiency of the unit.
Nominal efficiency is tested on units with a pipe length of 16 feet (4.9 m). Factory precharge is sufficient for supporting up to 25 feet (7.6 m) of connected lineset. If the factory precharge is modified, make a note of the charge modification. Piping should not be shorter than 10 feet (3 m) in length, as this would result in an overcharged unit. The shortest possible length is 5 feet but requires removing 1 oz of refrigerant.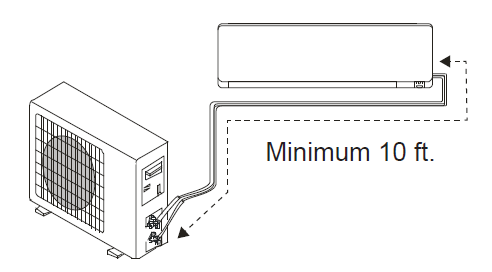
Refer to the Refrigerant Piping Specifications section below for information on the maximum length and drop height of the piping.
This article is for the following systems:
- Diamante Essenza (WYT-17)
- Diamante Pro (WYT-20)
- Quantum Ultra (WYT-24)
- Quantum Hyperformance (WYT-25)
- Quantum Fresh (WYT-FA)
Step 1: Cut Pipes (If Cutting the Lineset Shorter)
When preparing the refrigerant pipes, ensure the cut and flare is properly done. This will ensure efficient operation and minimize the need for future maintenance.
Note: Do not damage, kink, or deform the pipe while cutting. This will drastically reduce the efficiency and capacity of the unit, potentially causing internal damage.
- Measure the distance between the indoor and outdoor units.
- Use a rolling blade type pipe cutter to cut the pipe a little longer than the measured distance.
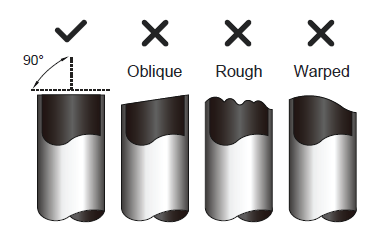
- Make sure that the pipe is cut at a perfect 90° angle. Refer below to the bad cut examples:
Step 2: Remove Any Burrs
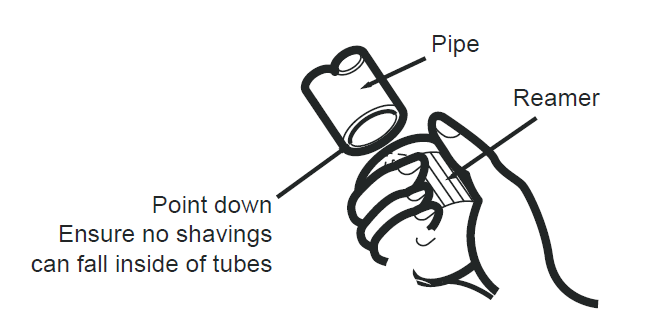
Burrs can affect the air-tight seal of the refrigerant piping connection. Completely remove any burrs.
- Hold the pipe at a downward angle to prevent burrs from falling into the pipe.
- Use a reamer or deburring tool to remove all burrs from the cut section of the pipe.
Step 3: Flare Pipe Ends
Proper flaring is essential for achieving an airtight seal.
- After removing the burrs from the cut pipe, seal the ends with PVC tape to prevent foreign materials from entering the pipe.
- Sheath the pipe with insulating material.
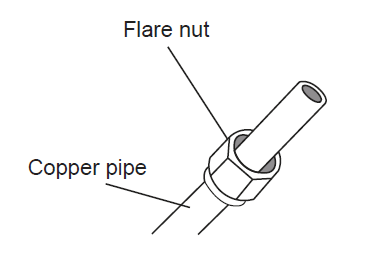
- Place flare nuts on both ends of the pipe. Make sure they are facing the correct direction, ensuring it cannot change its direction after flaring.
- Remove the PVC tape from the ends of the pipe when preparing to perform flaring work.
- Clamp the flare form on the end of the pipe.
 The end of the pipe must extend beyond the edge of the flare form in accordance with the dimensions shown in the following table:
Piping Extension Beyond Flare Form Outer Diameter of Pipe
(inch/mm)A (inch/mm) Min. Max. Ø 1/4" (Ø 6.35 mm) 0.03" (0.7 mm) 0.05" (1.3 mm) Ø 3/8" (Ø9.52 mm) 0.04" (1.0 mm) 0.06" (1.6 mm) Ø 1/2" (Ø12.7 mm) 0.04" (1.0 mm) 0.07" (1.8 mm) Ø 5/8" (Ø16 mm) 0.08" (2.0 mm) 0.09" (2.2 mm) Ø 3/4" (Ø19 mm) 0.08" (2.0 mm) 0.1" (2.4 mm) 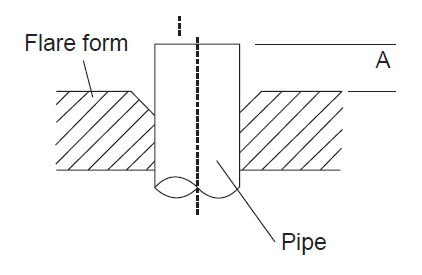
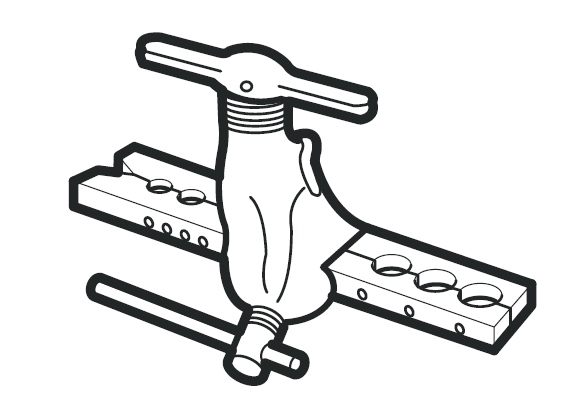
- Place the flaring tool onto the form.
- Turn the handle of the flaring tool clockwise until the pipe is fully flared.
- Remove the flaring tool and flare form, then inspect the end of the pipe for cracks.
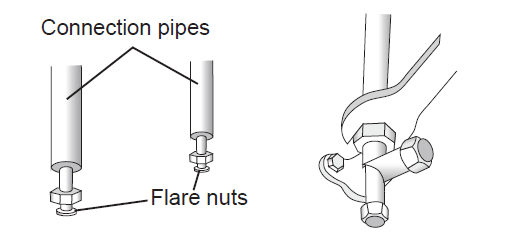
Step 4: Connect the Pipes to the Outdoor Unit
Begin by connecting the low-pressure pipe, then the high-pressure pipe.
Note: When connecting the refrigerant pipes, do not use excessive torque or deform the piping in any way. When bending connective refrigerant piping, the minimum bending radius is 4 inches (102 mm). 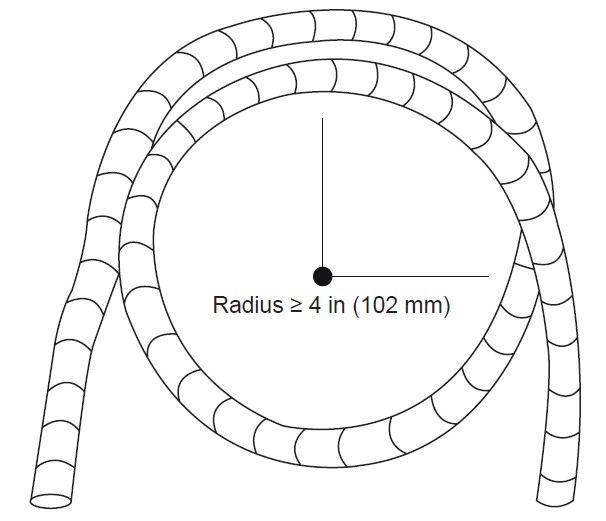
If provided by the supplier, apply leak guard material on all flared mating surfaces. Do not use any plumbing or putty sealants.
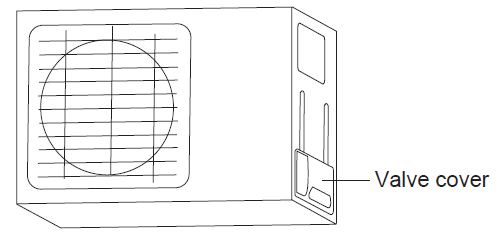
- Unscrew the cover from the packed valve on the side of the outdoor unit.
- Remove the protective caps from the valve ends.
- Align the flared pipe end with each valve and tighten the flare nut as tightly as possible by hand.
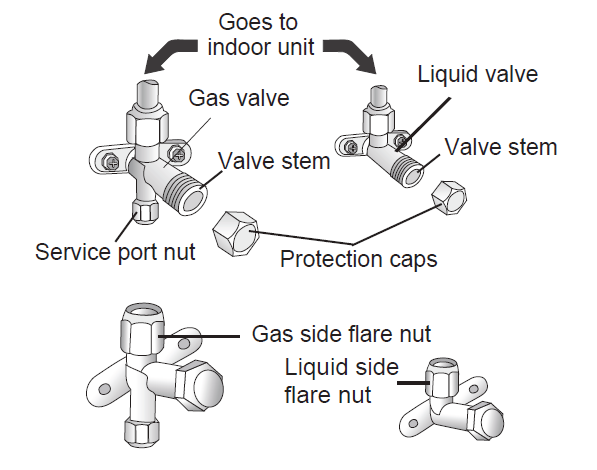
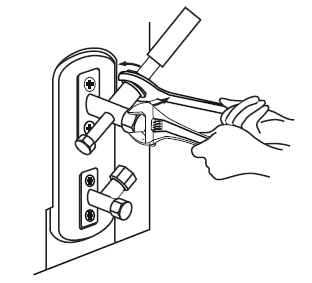
- Use a spanner to grab the body of the service valve. Do not grab the nut that seals the service valve. Note: Do not use excessive torque when tightening the flare nut. This can cause the flare nut to snap off or damage the refrigerant piping. Do not exceed the torque requirements shown in table:Pipe Diameter
Tightening Torque
[N x m]Tightening Torque
[ft-lbf]Corresponding Stress
(Using a 20 cm wrench)Φ 1/4" (6.35 mm)15-20 11-15 Wrist strength Φ 3/8" (9.52 mm) 31-35 23-26 Arm strength Φ 1/2" (12 mm) 45-50 33-37 Arm strength Φ 5/8" (15.88 mm) 60-65 44-48 Arm strength Tightening Torque [N x m] (ft-lbf)Service Port Nut [7-9] (5-7) Protection Caps [25-30] (18-22) - While firmly gripping the body of the service valve, use a torque wrench to tighten the flare nut according to the correct torque values.
- Loosen the flaring nut slightly, then tighten again.
- Repeat steps 3 to 6 for the remaining pipe.
Refrigerant Piping Specifications
Diamante Essenza (WYT-17) Model / Capacity (BTU/h) | 12K BTU | 18K BTU | 24K BTU | 36K BTU |
|---|---|---|---|---|
| Liquid Pipe Diameter | Ø 1/4 in (6.35 mm) | Ø 1/4 in (6.35 mm) | Ø 1/4 in (6.35 mm) | Ø 1/4 in (6.35 mm) |
| Gas Pipe Diameter | Ø 3/8 in (9.52 mm) | Ø 3/8 in (9.52 mm) | Ø 1/2 in (12 mm) | Ø 5/8 in (15.88 mm) |
| Max. Length of Pipe with Standard Charge | 25 ft / 7.6 m | 25 ft / 7.6 m | 25 ft / 7.6 m | 25 ft / 7.6 m |
| Max. Distance Between Indoor and Outdoor Unit | 50 ft / 15 m | 50 ft / 15 m | 65 ft / 20 m | 100 ft / 30 m |
| Adjustment Refrigerant Charge (For each additional foot after 25 feet) | 0.11oz/ft 10g/m | |||
| Max. Difference in Level Between Indoor and Outdoor Unit | 33 ft / 10 m | 33 ft / 10 m | 50 ft / 15 m | 65 ft / 20 m |
| Type of Refrigerant | R-32 | |||
Diamante Pro (WYT-20) Model / Capacity (BTU/h) | 9K/12K BTU | 18K BTU | 24K BTU | 30K/36K BTU |
|---|---|---|---|---|
| Liquid Pipe Diameter | Ø 1/4 in (6.35 mm) | Ø 1/4 in (6.35 mm) | Ø 1/4 in (6.35 mm) | Ø 1/4 in (6.35 mm) |
| Gas Pipe Diameter | Ø 3/8 in (9.52 mm) | Ø 3/8 in (9.52 mm) | Ø 1/2 in (12 mm) | Ø 5/8 in (15.88 mm) |
| Max. Length of Pipe with Standard Charge | 25 ft / 7.6 m | 25 ft / 7.6 m | 25 ft / 7.6 m | 25 ft / 7.6 m |
| Max. Distance Between Indoor and Outdoor Unit | 50 ft / 15 m | 50 ft / 15 m | 65 ft / 20 m | 100 ft / 30 m |
| Adjustment Refrigerant Charge (For each additional foot after 25 feet) | 0.11oz/ft 10g/m | |||
| Max. Difference in Level Between Indoor and Outdoor Unit | 33 ft / 10 m | 50 ft / 15 m | 50 ft / 15 m | 65 ft / 20 m |
| Type of Refrigerant | R-454B | |||
Quantum Ultra High-Wall (WYT-24) Model / Capacity (BTU/h) | 9K BTU | 12K BTU | 18K BTU | 24K BTU |
|---|---|---|---|---|
| Liquid Pipe Diameter | Ø 1/4 in (6.35 mm) | Ø 1/4 in (6.35 mm) | Ø 1/4 in (6.35 mm) | Ø 1/4 in (6.35 mm) |
| Gas Pipe Diameter | Ø 3/8 in (9.52 mm) | Ø 3/8 in (9.52 mm) | Ø 1/2 in (12 mm) | Ø 5/8 in (15.88 mm) |
| Max. Length of Pipe with Standard Charge | 25 ft / 7.6 m | 25 ft / 7.6 m | 25 ft / 7.6 m | 25 ft / 7.6 m |
| Max. Distance Between Indoor and Outdoor Unit | 50 ft / 15 m | 50 ft / 15 m | 65 ft / 20 m | 65 ft / 20 m |
| Adjustment Refrigerant Charge (For each additional foot after 25 feet) | 0.11oz/ft 10g/m | |||
| Max. Difference in Level Between Indoor and Outdoor Unit | 33 ft / 10 m | 50 ft / 15 m | 50 ft / 15 m | 65 ft / 20 m |
| Type of Refrigerant | R-454B | |||
Quantum Hyperformance (WYT-25) Model / Capacity (BTU/h) | 9K BTU | 12K BTU | 18K BTU | 24K BTU |
|---|---|---|---|---|
| Liquid Pipe Diameter | Ø 1/4 in (6.35 mm) | Ø 1/4 in (6.35 mm) | Ø 1/4 in (6.35 mm) | Ø 1/4 in (6.35 mm) |
| Gas Pipe Diameter | Ø 3/8 in (9.52 mm) | Ø 3/8 in (9.52 mm) | Ø 1/2 in (12 mm) | Ø 5/8 in (15.88 mm) |
| Max. Length of Pipe with Standard Charge | 25 ft / 7.6 m | 25 ft / 7.6 m | 25 ft / 7.6 m | 25 ft / 7.6 m |
| Max. Distance Between Indoor and Outdoor Unit | 50 ft / 15 m | 50 ft / 15 m | 65 ft / 20 m | 65 ft / 20 m |
| Adjustment Refrigerant Charge (For each additional foot after 25 feet) | 0.11oz/ft 10g/m | |||
| Max. Difference in Level Between Indoor and Outdoor Unit | 33 ft / 10 m | 33 ft / 10 m | 50 ft / 15 m | 65 ft / 20 m |
| Type of Refrigerant | R-454B | |||
Quantum Fresh (WYT-FA) Model / Capacity (BTU/h) | 12K BTU |
|---|---|
| Liquid Pipe Diameter | Ø 1/4 in (6.35 mm) |
| Gas Pipe Diameter | Ø 3/8 in (9.52 mm) |
| Max. Length of Pipe with Standard Charge | 25 ft / 7.6 m |
| Max. Distance Between Indoor and Outdoor Unit | 50 ft / 15 m |
| Adjustment Refrigerant Charge (For each additional foot after 25 feet) | 0.11oz/ft 10g/m |
| Max. Difference in Level Between Indoor and Outdoor Unit | 33 ft / 10 m |
| Type of Refrigerant | R-32 |