Air Evacuation and Bleeding the Circuit for Wall-Mounted SystemsUpdated a day ago
Introduction
This article explains how to complete the air evacuation and bleed the circuit for wall-mounted systems.
The air and/or humidity left inside the refrigeration circuit can contaminate the refrigerant and cause abnormal spikes in pressure, leading to eventual compressor malfunctions. Therefore, after connecting the indoor and outdoor units to create a closed system, it is necessary to bleed the air and humidity out of the circuit by using a vacuum pump.
Perform the evacuation after the initial installation or when the unit is relocated. For first time installations, do not prematurely release the refrigerant prior to evacuation. Keep the valve caps sealed.
This article is for the following systems:
- Diamante Essenza (WYT-17)
- Diamante Pro (WYT-20)
- Quantum Ultra (WYT-24)
- Quantum Hyperformance (WYT-25)
- Quantum Fresh (WYT-FA)
Before Performing the Evacuation
Check to make sure that both the high-pressure and low-pressure pipes between the indoor and outdoor units are connected properly.
Check to make sure all wiring is connected properly and is fully enclosed and insulated.
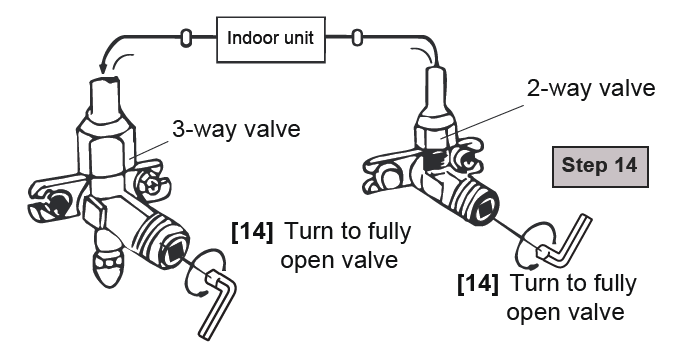
Steps
Follow these steps to complete the air evacuation and bleed the circuit:
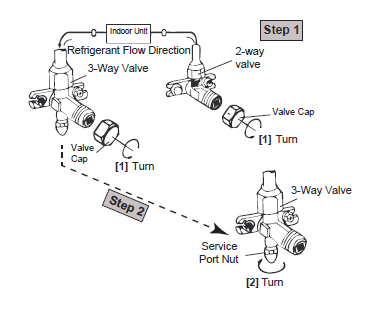
- Remove the caps from the 2-way and 3-way valves. Do not manipulate the valves until step 11.
- Unscrew and remove the cap from the service port.
- Connect the blue (low) hose of the manifold gauge to the service port on the outdoor unit's 3-way valve. Use an adapter if needed. Ensure that the pin fully engages the Schrader valve.
- Connect the yellow (middle) hose from the manifold gauge to the vacuum pump.
- Open the low pressure valve of the manifold gauge. Keep the high pressure valve closed.
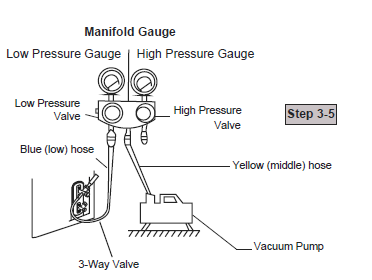
- Turn on the vacuum pump to evacuate the system.
- Run the vacuum for at least 15 minutes or until the compound meters reads -76cmHG (-100kPa or -30 inHg). The vacuum reading should gradually decrease.
- Close the low pressure side of the manifold gauge and turn off the vacuum pump.
- For the best results, wait for at least 1 hour, then verify that there has been no increase in the vacuum reading.
- If there is no change in the vacuum reading, unscrew the cap from the service valve (high pressure valve). Note: If there is a rise in the system vacuum, refer to this Gas Leak Check article.
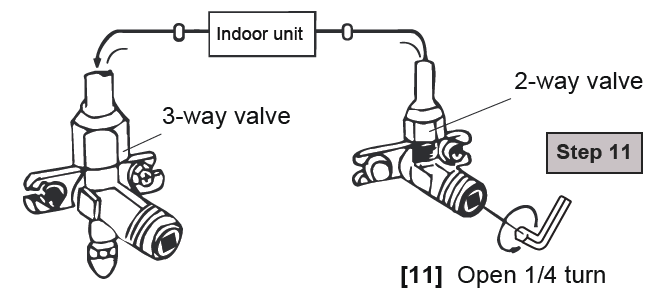
- Insert the Allen wrench into the service valve (2-way valve) and open the valve by turning the wrench in a 1/4 counterclockwise turn. Wait and listen for gas potentially exiting the system, then close the valve after 5 seconds.
- Notes:
- When opening valve stems, turn the supplied Allen wrench until the valve stem comes into contact with the stopper. Do not try to force the valve to open further.
- Do not open either of these valves until evacuation steps are completed and the system is ready for startup.
- Notes:
- Watch the pressure gauge for a few minutes to make sure that there is no drop in pressure. The pressure gauge should now show higher than the atmospheric pressure.
- Remove the charge hose from the service port.
- Use a hexagonal wrench to fully open both the high pressure and low pressure valves counterclockwise.
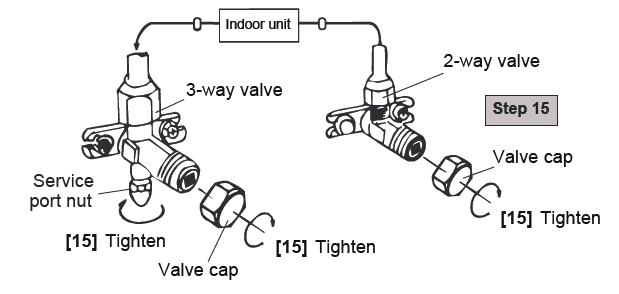
- Tighten valve caps on all three valves (service port, high pressure, low pressure) by hand. Tighten further using a torque wrench if needed.