
Mounting the Outdoor UnitUpdated 3 months ago
Introduction
Find out how to mount outdoor units on the ground or wall brackets.
Prepare the installation base for each unit according to its specified dimensions. Click this link for information.
Warning
When drilling into concrete, eye protection is recommended at all time.
Notes
General Notes
- Follow all national regulations when installing the unit.
- Before connecting any pipes or cables, install the outdoor unit on a pad or solid wall using suitable mounting brackets.
- Decide the best position on the wall or ground and leave enough space in order to carry out maintenance easily.
Mounting on Slabs
- The installation of the drain joint and tubing is not necessary when mounting the unit on slabs.
Wall Mounting
- Before mounting the unit on the wall, make sure the wall is made of solid brick, concrete, or a similarly strong material. The wall must be able to support at least four times the weight of the unit.
- Fasten the supporting brackets to the wall using hardware that is particularly suited for the type of wall. Use the appropriate amount of hardware for the application. Installing four rubber pads is optional.
- If allowed, install the wall-mounted unit with rubber gaskets to reduce vibration and noise.
Ground/Concrete Mounting
1. Mark the positions for the four bolts based on the dimensions.
2. Pre-drill holes for the bolts.
3. Clean the concrete dust away from the holes.
4. Place a nut on the end of each bolt.
5. Hammer the bolts into each hole.
6. Remove the nuts from the bolts and place the outdoor unit onto the bolts.
7. Put washers onto each expansion bolt, then replace each of the nuts.
8. Use a wrench to tighten each nut until snug.
Wall-Mounted Bracket
1. Mark the positions for the bracket holes based on the dimensions.
2. Pre-drill holes for the bolts.
3. Clean the concrete dust away from the holes.
4. Place a washer and nut on the end of each bolt.
5. Thread expansion bolts through the holes in the mounting brackets. Then, put the mounting bracket in position and hammer the expansion bolts into the wall.
6. Confirm the mounting bracket is level.
7. If the feet of the outdoor unit have rubber pads already installed and are using a local dealer's wall-mounting bracket, remove them before attempting to mount the condenser to the bracket. The mounting bracket has rubber isolating pads on it that will take the place of these.
8. Carefully lift the unit and place its mounting feet on the brackets.
9. Bolt the unit firmly to the brackets.
Multiple Outdoor Units
If multiple outdoor units are being installed in a row, follow these guidelines:
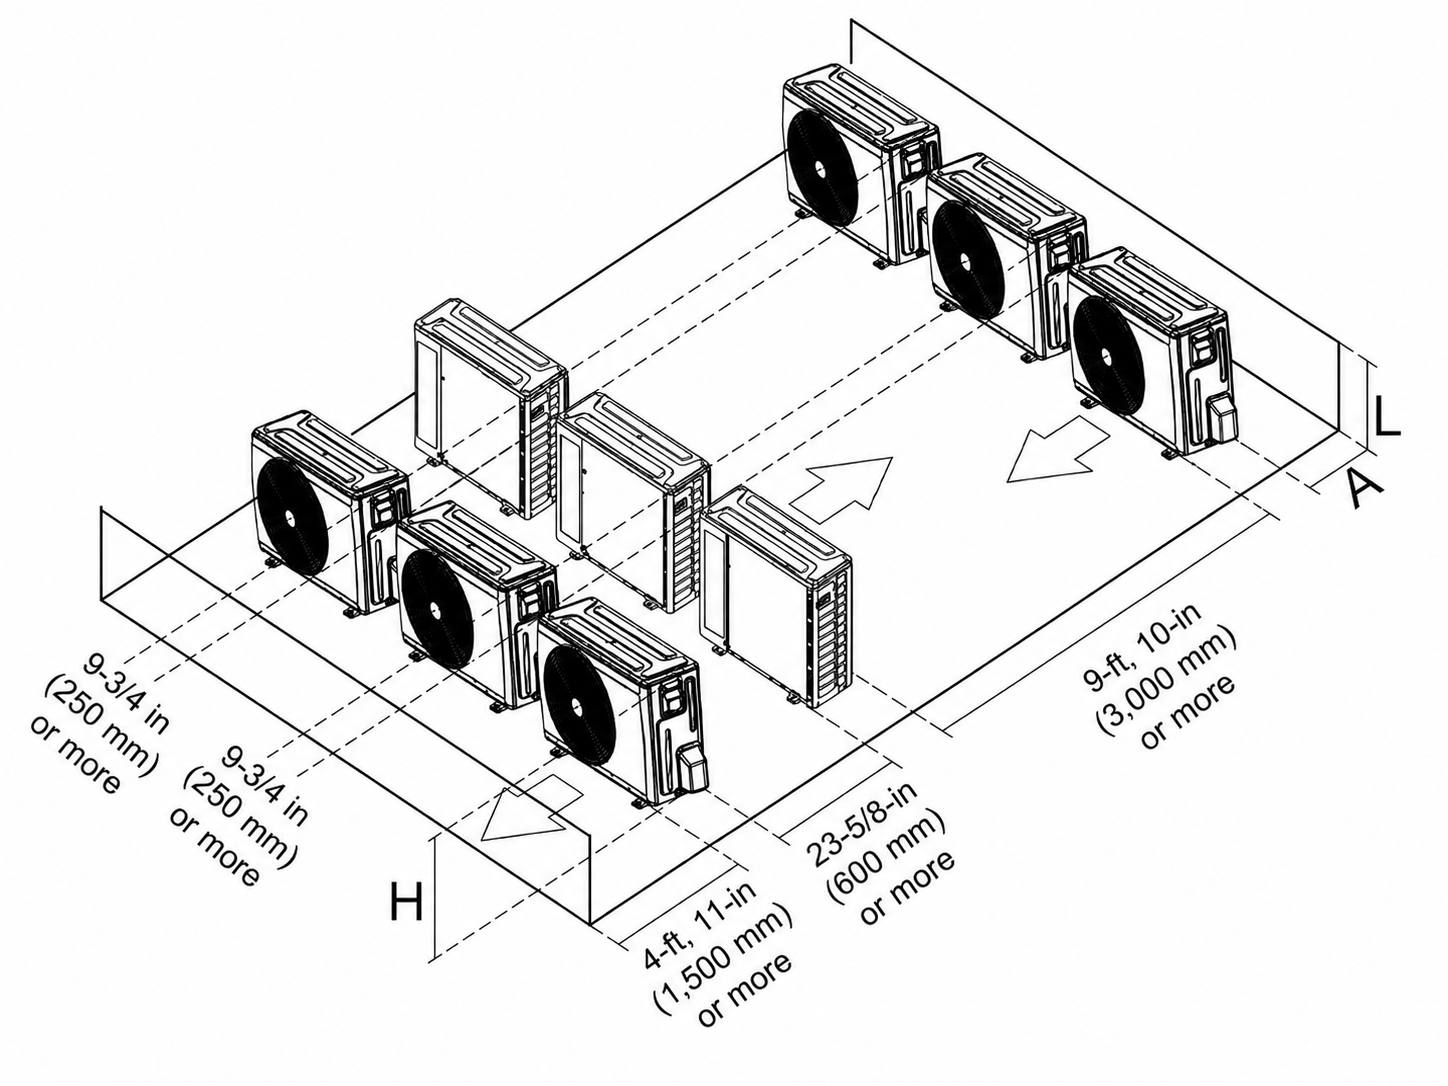
H: Unit height
L: Height of the wall behind the unit
A: Distance between the unit and wall
| L | A | |
| L ≤ H | L ≤ 1/2H | 9-3/4 in (250 mm) or more |
| 1/2H < L ≤ H | 11-3/4 in (300 mm) or more | |
| L > H | Cannot be installed | |