EC or EL 0C Error CodesUpdated 5 months ago
Introduction
The “EC” or “EL 0C” error codes indicate the system detects refrigerant leakage. This article is for discontinued Quantum series systems (WYS, CYB, RYB, UYB, and FYB).
Prerequisites
Recommended parts to prepare:
- T2 sensor
- Indoor printed circuit board (PCB)
- Additional refrigerant
Troubleshooting
Note: An HVAC professional may be required for assistance.
The troubleshooting recommendations for new or recently installed units include:
- Open the valves on the outdoor unit fully. The valves release the refrigerant from the outdoor unit into the circuit.
- Ensure that the length of the piping used for the indoor unit does not exceed the pre-charge refrigerant length. (25 ft. pre-charge per zone)
- Inspect the unit for a potential leak. Check the following:
- Oil stains or residue around the unit’s fittings and connections.
- Hissing or bubbling sounds near the unit when it’s running.
- Reduced cooling or heating performance.
- Check the pressure PSI for the unit and verify it’s within the appropriate range. Use r410a-compaible gauges while the system is on and running to check the pressure PSI. Use the manual button on the indoor unit to force the compressor to turn on. Note: Use the Refrigerant Pressure-Temperature chart for reference when checking the pressure PSI.
The troubleshooting recommendations for used units include:
- Power off the unit and restart it after 2 minutes. If the problem continues, put your hands in front of the indoor air outlet.
- Check if there is cool air blowing out from the indoor air outlet.
- If yes, check the T2 sensor.
- If no, check the system for leakages.
- If the T2 sensor is securely attached, replace the indoor PCB.
- Repair any leakages and recharge the refrigerant. If there are no leakages present, clear potential blockages in the unit.
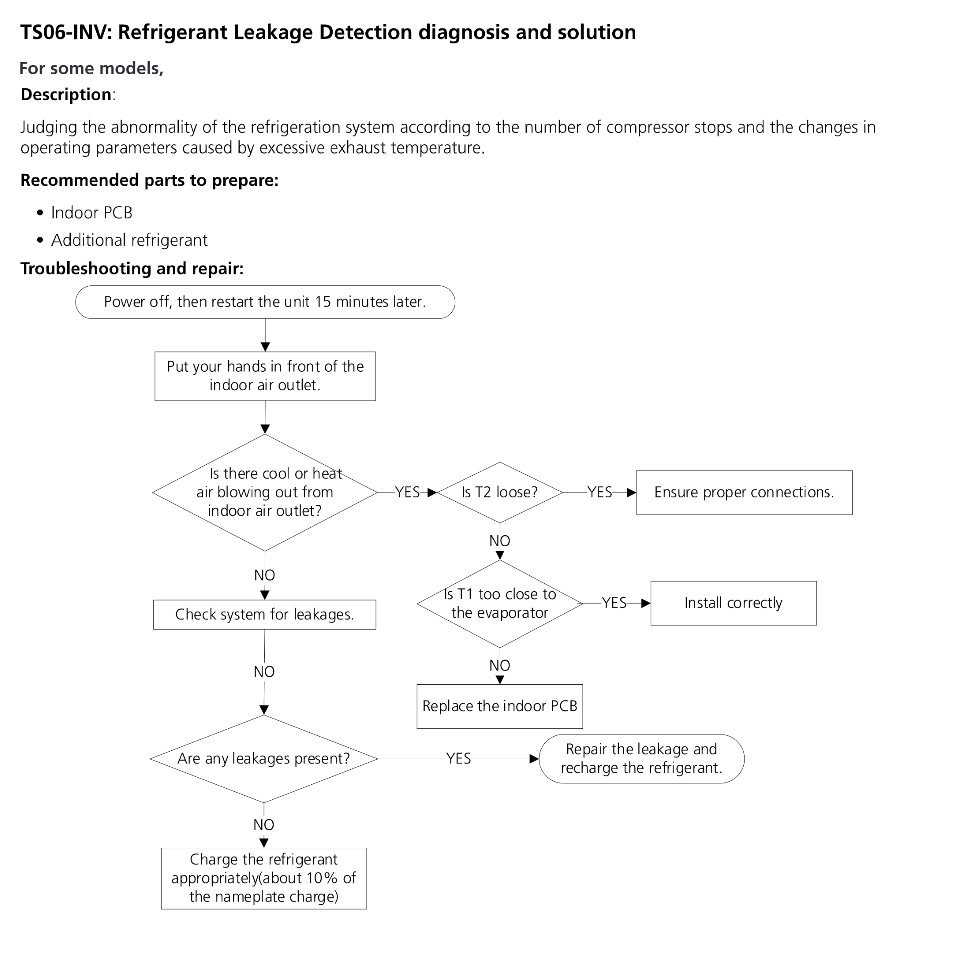
The troubleshooting recommendations for units with excessive exhaust temperatures include:
- Power off the unit and restart it after 15 minutes. If the problem continues, put your hands in front of the indoor air outlet.
- Check if there is cool air blowing out from the indoor air outlet.
- If yes, check the T2 sensor.
- If no, check the system for leakages.
- Check if the T2 sensor is loose.
- If yes, ensure that the T2 sensor is properly connected.
- If no, check if the T1 sensor is too close to the evaporator.
- Check if the T1 sensor is too close to the evaporator.
- If yes, re-install the T1 sensor correctly.
- If no, replace the indoor PCB.
- Repair any leakages and recharge the refrigerant. If there are no leakages present, charge the refrigerant appropriately, which is about 10% of the nameplate charge. Note: Refer to the Methods for Checking Leaks section for information on how to find leaks in the system.
Methods for Checking Leaks
- Check for leaks by combining water with a small amount of dish soap or liquid detergent. Apply the soapy water solution to the fittings, connections, and tubing of the indoor and outdoor units while the system is turned on. The particular spot where the bubbles form indicates the location of the refrigerant leak.
- Leak detector tools can detect refrigerant leaks through electronic sensors along the piping and around the unit coils.
- Nitrogen pressure testing is commonly used by leak detection techs.
Note: Warranty coverage requires a confirmation of the location or origin of the leak.
Troubleshooting Diagrams