Understand the Remote Controller for ECOasis 50 Energy Recovery VentilatorsUpdated 5 months ago
Introduction
This article explains the remote controller for ECOasis 50 Ductless Wall-Mounted Single-Room Energy Recovery Ventilators.
This article begins by explaining the layout of the remote controller, then explains the pair synchronization function. In addition, the article will also explain how to properly insert the batteries into the remote controller.
Layout of the Remote Controller
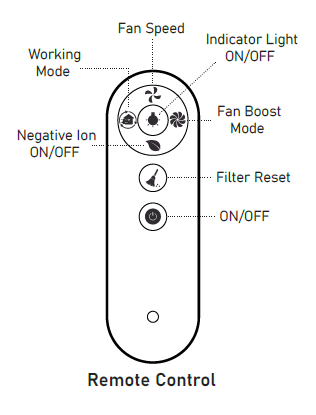
- Fan Speed: This button switches the fan speed of the device. There are three speeds in total.
- Working Mode: This button switches the working mode of the device. The available working modes include Supply mode, Exhaust mode, and Regeneration mode.
- Negative Ion On/Off: This button acts as the negative ion generator power socket work switch. When the negative ion function is turned on, the device supplies air with the power supply. The negative ion generator can be purchased separately and added on.
- Indicator Light: This button acts as the control indicator light for on and off.
- Fan Boost Mode: This button sets the fan into fan boost mode, where the fan runs at maximum power if there is no other setting. The device runs this mode for 30 minutes before exiting automatically.
- Filter Reset: After replacing the filter of the inner air duct, press and hold the button for 5 seconds. This results in the device's red light to flash three times, indicating the cleaning time is reset. The default reset time is 720 hours.
- On/Off: Use this button to turn on or off the device.
Pairing Synchronization Function
When controlling the device via the remote controller, point the controller at the device head-on.
The maximum unobstructed communication signal distance is 50 feet (15 m). The signal from the master unit and slave unit can pass through a brick wall up to 7 inches (178 mm).
Without setting a master/slave role, one remote control can control one or more devices.
After setting the master/slave role, the remote control can only control the master unit. The master unit forwards the synchronization signal to the slave unit. The slave unit will not receive the remote control signal. The master unit can only control one slave unit.
In Regeneration mode, the operation direction of the slave fan is opposite to that of the master, while the direction of the slave fan in other modes is the same as that of the master.
Master Unit Settings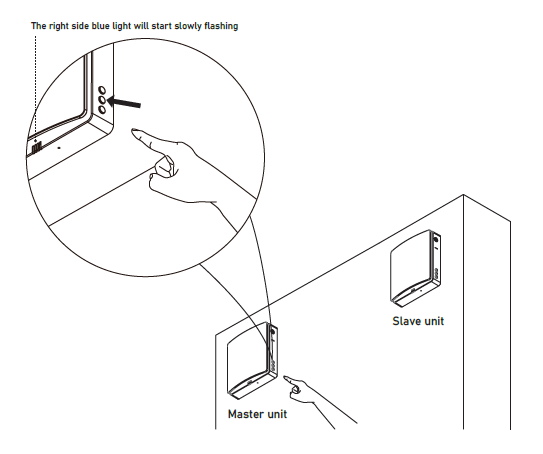
Connect the device to power. In the off state, press and hold the unit's fan speed button for 5 seconds. This will result in the status indicator blue light to flash slowly.
After the status indicator light flashes, the device enters master-slave linkage mod, and the unit is set to the master role.
Slave Unit Settings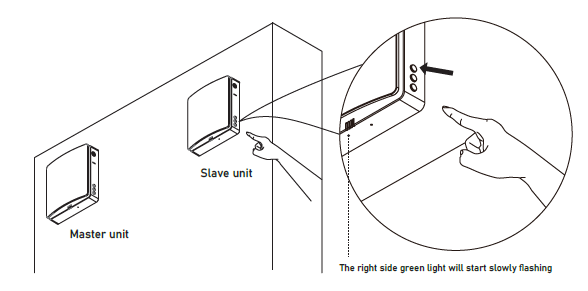
Connect the device to power. In the off state, press and hold the unit's mode button for 5 seconds. This will result in the status indicator green light to start flashing slowly.
After the status indicator light flashes, the device enters master-slave linkage, and the unit is set to the slave role.
During the master and slave set pairing mode, it must be carried out at the same time within 1 minute. The devices should be as close as possible. The devices will be automatically connected.
The status light of the paired devices will change to the blue light, indicating that the master-slave pairing is successful.
If the master-slave pairing fails, the status light on the devices will flash for one minute, then the lights turn off automatically.
Insert the Battery into the Remote Controller
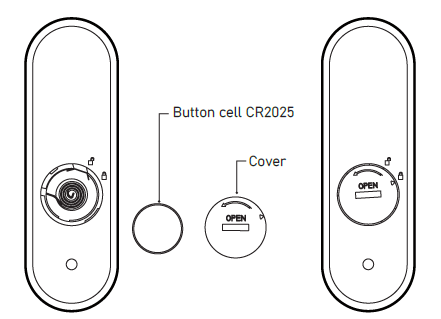
- Insert the battery into the remote controller.
- After inserting the battery, screw the battery cover clockwise until the cover triangle arrow indicates the locking pattern, which means it is locked. Do not tighten the cover with your bare hands to avoid potential injury.
- To remove the battery, turn the battery cover counterclockwise until the triangle arrow of the cover indicates the unlocking pattern. Once loose, the battery can be removed.